Uncategorized


I love stirfries. They’re our default meal at home – quick, nutritious, versatile and tasty. This one is especially easy, since the tempe doesn’t need to be precooked or have anything fancy done to it.

Although I was vegetarian for a long time, I don’t much like most versions of tempe – I find most of them mushy and tasteless-yet-tangy. Nutrisoy do a tempe ‘burger’ though, which is nutty and firm and tasty – I like it a lot. And it’s available in most supermarkets, which is even better.

There’s quite a lot of ginger in this recipe, as it’s very good for my poor arthritic feet and their struggles to deal with winter. The final meal isn’t overly hot – or gingery, but feel free to adjust the amount of ginger to your taste, if you’re not as fond of it as I am.

The main thing with stir frying is to use a high heat. I’ll go into tips for successful stirfrying in another post; for the moment, just remember to have your wok (or frypan, at a pinch) hot, and keep your ingredients moving.

I also used a secret ingredient in this recipe.

When I last went to Penang, I tracked down an old fashioned soy sauce maker, one of the few remaining who brew the sauce naturally, by hand, without additives or preservatives. The place was so obscure that our driver had to call them and find out where they were hidden, but it was worth it. This stuff is ambrosial; complex and deeply flavoured (our driver left with several bottles himself, so he obviously thought it was worth the trip as well). I used some of it in the stirfry – but if you don’t happen to have artisanal, ambrosial soy sauce on hand, just use the usual stuff. It’ll still be tasty.
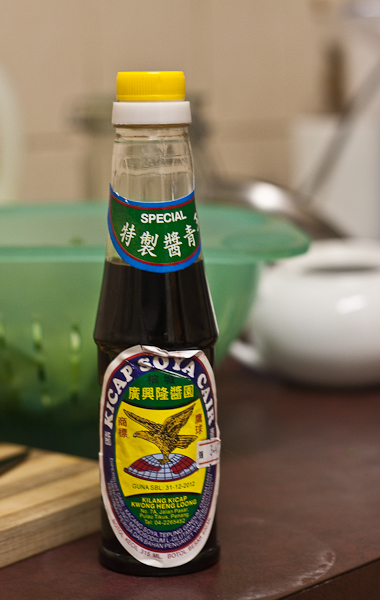
Handmade Soy sauce from Penang. Yum!

My secret special soy - not so secret now!

Tempe & Ginger Stirfry

There are a lot of different ways to vary this recipe – feel free to experiment with different vegetables or sauces.


Ingredients

2 x Nutrisoy tempe burgers (There’s three to a pack; if you both have big appetites, use all three)

1/2 capsicum (bell pepper)

2 sticks of celery

2 heads of bok choy (or other green of your choice)

2 garlic cloves (optional, but the finished stirfry certainly isn’t over garlicky)

Fresh ginger, about the length of your thumb, or a little less

1/2 tablespoon peanut oil (or olive oil if you prefer)

Soy sauce to taste

Rice, to serve

Method

Put the rice in the rice cooker, and turn it on – or start it cooking in your usual way.

Slice the bok choy into chunks, and rinse well to remove any dirt, then set aside to drain. Slice the ginger into small sticks, and peel the garlic ready for the garlic press (or mince it finely if you’re that way inclined). Cut the tempe burger into even strips, and cut the celery and capsicum into even pieces as well.
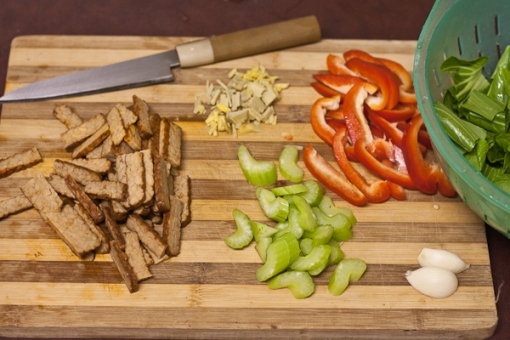
Stirfry ingredients, ready for cooking

Make sure you chop your ingredients evenly, and try to have everything ready to go before you start cooking

Put the wok on the stove at as high a heat as possible. Add the oil. When it runs across the pan like water, add the ginger and garlic, and stir well for a few seconds, until you can smell them clearly. Add the tempe burger to the wok, and cook for about a minute or two until it browns slightly. Add the celery and capsicum. You may find it helpful to add about a teaspoon of water, to steam the vegetables a little – they cook faster, and you end up using less oil.

When the celery and capsicum start to soften, and their colours are bright, add in the bok choy and stir until it’s just wilted and cooked. Turn the heat off, add soy sauce to taste, and serve.
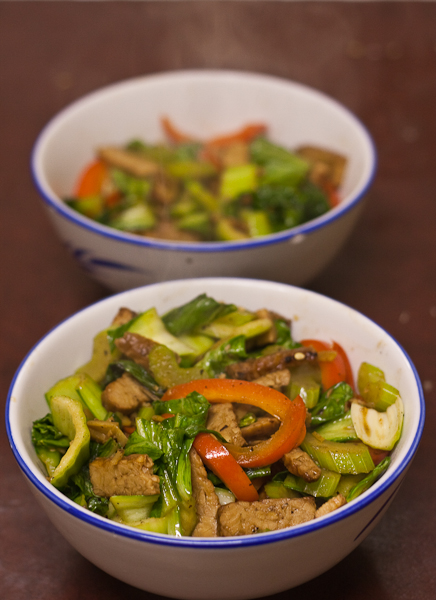
Tempe and Ginger Stirfry

Eat while fresh and hot - yum!

Enjoy!

Yes, I’m still here. It’s been a busy couple of weeks – I’ve gone from unemployment to two shiny new jobs, and am settling myself back into the routine of full-time work. As well, this cold, damp, Sydney-winter weather plays havoc with my disabilities and pain levels, making it even harder to put in the effort to cook healthy food.

As a result, I’ve been eating more takeaway than I like. M has been cooking as well, but as he travels a lot, it really is up to me to make sure I look after myself.

So, the focus for the next couple of weeks will be quick and easy meals that are still healthy and nurturing. Some of them, like last night’s baked sausages and vegetables, take next to no time to prepare, but about an hour in the oven, while others are as quick to cook as they are to put together. I’ll be posting a homemade pesto recipe in the next few days, assuming I can find some nice basil, with some more recipes to follow over the coming week.

Let me know if you have any requests!

So, what happened to the home-made kimchi. I said in my last post to give your kimchi about two to three days to ferment, before you popped it in the fridge. Of course, I then went out of town, leaving my kimchi sitting happily on the bench, and came back five days later.

And whaddaya know, it’s delicious.

Fresh, sour, tasty kimchi ready for dinner tonight

It’s salty, hot and bitey from the chilli, tangy and sour from the fermentation, and delicious. Next time, I’ll reduce the salt slightly – it’s a little saltier than I’d prefer, but we’re going to have no problems chowing our way through this batch. In fact, we’ll be eating this lot tonight.

Did anyone else try the kimchi recipe yet? How did it turn out?

Back at the end of May, I made roast duck. Since I dislike wasting leftovers (and since I don’t roast meat often enough to get sick of saving the carcass), I made stock out of the bones the next day – and then a Vietnamese-style soup from the broth. There wasn’t enough duck left over to add meat to the soup, but the flavour from the stock came through clearly enough to make it deliciously full of unami anyway.

The soup turned out well – I ended up bowls of warm, fragrant soup, redolent of star anise, rich duck, lemon, and a subtle hint of cinnamon. Lovely on a cold winter’s night!

Duck stock

Any leftover stock can be frozen to use later – it’s probably worth concentrating it as much as you can, so it takes up less space in your freezer. You can freeze it in icecube trays to get little cubes of stock to add flavour to foods, or just freeze it in a lump.

Ingredients

1 roast duck carcass, along with reserved wingtips & neck bone

2-3 sticks of celery, roughly chopped

1 onion, also roughly chopped

1 carrot, yet again roughly chopped

3 shiitake mushrooms  – I had fresh ones on hand, but dried would be just as good or better. Tear them into chunks.

1 small piece of kombu (Dried kelp. This is optional, but it does add to the umami)

Tops of two spring onions

Piece of cinnamon bark

2 star anise

3-4 good slices of fresh ginger

About a teaspoon of peppercorns (fresh or dried – I happened to have fresh ones)

About 10 ripe cherry tomatoes (because they needed using – but they also add a richness to the stock)

Making duck stock

Pop all the ingredients for your stock into a big pot, cover with cold water, then cook for about an hour and a half

Method

Throw all in pot, cover with cold water (it’s very important that you use cold water – it helps bring all the flavours out of your ingredients), bring slowly to simmer. Cook on a low heat for about an hour & a half to two hours. If necessary, remove all the solid ingredients and reduce the stock to concentrate the flavours, or just season to taste.

Vietnamese-style duck broth

This soup may look complicated, but it’s actually very quick and  straightforward, if you have the stock already made. You can substitute the vegetables and meat for whatever you have in the cupboard, so it’s a good way of using up your excess veg, as well.

Ingredients

Duck stock – about 4 cups per person.

4 shiitake mushrooms

tops of 1-2 spring onions, cut into rounds

A handful of enotake mushrooms, bottom piece removed.

1 carrot, finely sliced

Noodles of your choice – I used sweet potato noodles, but rice noodles or wheat noodles will work too)

Handful of green beans, cut into bite-sized pieces

Leftover duck meat, if you have any, or thinly-sliced beef, or tofu (we used vegetarian burdock balls, since they were in the freezer)

1 lemon, sliced into quarters

Fresh mint (optional)

Soy sauce and fresh chilli slices, as dipping sauce

Method

Warm the stock until just boiling. Add the mushrooms, carrot, beans, and leftover meat or substitute to the broth, and cook ’til just tender. Pour boiling water over the noodles, and add to the soup to finish cooking.

Serve with lemon slices and fresh mint, and soy and sliced chilli on the side.

Serves 2

Vietnamese-style duck soup

Duck soup, taken on the couch just before eating. There almost wasn't a finished picture of this - it smelt so good I very nearly just dug in!

I’m still finding the knack for stock. I’m not sure if it’s just that commercial stocks are filled with additives and a half-tonne of salt to make them enticing, but many of the stocks I’ve made previously have seemed a bit insipid – vegetable ones especially. This one worked out well, especially once I’d turned it into soup, but I’m still working on getting the full flavour of my ingredients into the stocks. Any suggestions gladly accepted!

In other news, my sourdough adventures continue. I made a batch of spelt & wholemeal bread last week, and it turned out surprisingly well! Embarrassingly enough, it’s the first loaf I’ve made that actually came out of its banneton after rising without getting stuck and pulled around, and it looks lovely and rustically cute. Once I cut into it, too, it had a nice crumb, with reasonable sized air holes in it, and a fine, translucent character to the bread. It tastes good, too – quite mild, for a sourdough, since I used my dry starter, and it was recently fed, but still with that complex sweetness and flavour depth of a good sourdough.

Spelt & Wholemeal Sourdough

Cooling from the oven. It looks so tasty!

I think this one worked partly because it’s a slightly drier dough than I usually work with, and partly because the banneton is finally getting seasoned with the right flour. I still have a long way to go, but it’s very encouraging!

Rustic Sourdough

I'm definitely getting better at my baking

As I promised last week, here’s another recipe for anyone still trying to work out what one does with daikon, other than wave them around the kitchen, in all their long radishy glory. I made this for dinner last night, along with a hot & sour stir fry of tofu, eggplant and capsicum, and some quick daikon & carrot pickles. It was well tasty!

The sauce for this dish is a sweetened miso sauce, known in Japan as dengaku miso. It keeps indefinitely in the fridge, and is traditionally used for Japanese country-style cooking, on top of eggplant or tofu. Because it’s cooked, the healthy miso cultures will no longer be viable, so I usually stir a little bit of fresh miso back into it when I put it in the fridge, in the hopes that it will recolonise. I have no idea if it actually works, but it can’t hurt.

Braised Daikon with Sweet Miso

The rice is there to soak up the bitterness of the daikon, resulting in a smooth, tender vegetable base for the sweet miso to shine through. The quantities of mirin and sugar aren’t a typo, you really do want almost as much sugar and mirin as miso.

Ingredients

1 daikon radish

1 tablespoon of rice (any type except basmati or jasmine)

1 largish piece of kombu seaweed (optional)

2 tablespoons of red miso

1.5 tablespoons raw sugar

1.5 tablespoons mirin (sweet Japanese cooking wine)

Peeled daikon radish chunks

Peeled daikon chunks, ready for simmering

Method

Peel the daikon and cut into 4 chunks. Put the chunks and the rice into a saucepan and cover with cold water. Bring to the boil over medium to high heat, then reduce heat to medium and simmer until daikon is tender when poked with a skewer or knifepoint; this will probably take about 20 minutes. Drain and discard the rice, and rinse the daikon chunks under cold water until cool.

While the daikon is cooking, make the miso sauce. Mix the miso, sugar and mirin together, then cook over medium heat until it starts to bubble, then reduce the heat to as low as possible, and stir constantly until the mixture is thick – you want it about as thick as your original miso. Turn the heat off and let the sauce sit while you finish the daikon.

Daikon radish & kombu seaweed

The braised daikon chunks soaking with kombu seaweed. That's the sweet miso sauce behind it, too.

Wash the saucepan you cooked the daikon in, then pop in the kombu and radish chunks, and cover with cold water again. Heat the pot to almost boiling point, then turn the heat off and let it sit for about 15 minutes to absorb the kombu flavour. If you don’t happen to keep dried seaweed in your kitchen, you can substitute with instant dashi (Japanese stock), or just use plain water. The seaweed does give it a lovely subtle flavour, though. I save the seaweed flavoured water afterwards, too, to use as a stock base.

While the daikon is sitting around, I usually stirfry whatever I’m serving along with it.

To serve, stand 2 chunks on your plate and top with a generous teaspoon of the miso. Add in whatever else you’re serving for your tasty dinner. Eat, making happy noises.

Braised daikon with sweet miso, and hot & sour stirfry

Serves 2 people as a side dish.

Just to round off the daikon posts, here is the daikon I started drying in last week’s daikon post. As you can see, it’s shriveled up and dried nicely, and is ready to be popped into a jar until the next time I make an Asian-style hotpot. So if you’re really stuck for things to do with your radish, you can always delay having to make up your mind!


Dried daikon radish

Last week's daikon slices, now completely dry and ready to put away

One of the meats in the last Feedbag was some diced goat. I haven’t actually cooked diced goat, but I’ve eaten goat curry both locally and overseas, and loved it each time, so it was easy enough to work out what to do with it.

I spent a little while drooling through various cookbooks. I ended up going with a recipe from my current favourite Indian cookbook, Mangoes and Curry Leaves, by Jeffrey Alford & Naomi Duguid. This is the sort of cookbook I want to write – part cookbook, part travelogue, part photo book, and full of very authentic, and very tasty recipes. The recipe I ended up using for my precious diced goat was a ginger & coconut lamb curry from Southern India. It’s full of tasty spices like toasted coriander seeds, cinnamon, turmeric, and lots of ginger, while still fairly easy to prepare. And best of all, I had all the necessary ingredients in my cupboard.

I won’t give you the whole recipe here, since I used the cookbook version almost exactly, and I don’t want to steal anyone’s creativity, but I would like to share the spice marinade. This smelled unbelievably good. Seriously. I’m going to make this up separately as a marinade for meats, since it was just so damned good on its own. And quite quick and easy to make!

I prepared this in my mortar and pestle, since it was quite straightforward,  and I like pounding things with rocks. If you don’t own a mortar, or you just don’t like smashing things, feel free to use a food processor or spice grinder.

Toasted Coriander & Ginger rub for tasty meats

(from Mangoes & Curry Leaves)

The secret with this is the toasted coriander – toasting it not only brings out its spicy, nutty fragrance, but adding it hot to the marinade seems to bring out the other ingredients as well – especially the ginger.

Ginger & Toasted Coriander Marinade

This went together really easily and quickly, and smelt amazing.

Ingredients

1 tablespoon of ginger, chopped roughly

1/2 teaspoon cayenne pepper (I used two dried chillies from a previous feedbag)

1 teaspoon of coriander seeds

1/2 teaspoon ground turmeric

1 teaspoon of sea salt

Method

Toast the coriander seeds in a dry frypan until fragrant. Pop the other ingredients into your mortar or food processor, then add the coriander seeds while still hot. Pound or blend until a rough paste, then rub on meat of choice. Leave at least an hour to marinate before cooking.

Easy, isn’t it! And it is so very, very fragrant and tasty – I’m hungry just thinking about it.

Ginger & Coconut Milk Goat Curry

Delicious, fresh goat curry

The rest of the curry recipe went together equally as well, as you can see from the finished curries. I served them with a fresh mint chutney, also from Mangoes & Curry Leaves, since I wanted something bright and fresh to bring out the flavours, and my poor mint from the last box was looking very wilted and forlorn on the bunch. It was all uber-tasty.

Fresh mint chutney

Tasty fresh mint chutney

Next Page »